
"Email Already in Use..."
You have a client who now wants to attend couples therapy…
You have a child whose sibling is starting therapy too…
You try to do the above and you get the dreaded “Email already in use” message when you attempt to activate their portal.
So frustrating!
You have a client who now wants to attend couples therapy…
You have a child whose sibling is starting therapy too…
You try to do the above and you get the dreaded “Email already in use” message when you attempt to activate their portal.
So frustrating!
But, this is fixable and SP DOES allow people to be in different charts in different ways. You do not need additional emails for the person or any other crazy work arounds. And SP Documentation attempts to explain this, but let me try to simplify it:
Rule: Only Enter a Person in the System ONE TIME.
After that, you will access their profile to place them in other parts of SP.
Here are the simple steps to never have a problem with this again:
Look up the person you’d like to add in SP - Go to Clients and filter for ‘Clients and Contacts’ > search for the person (client, contact, anyone you are trying to add unless they are a totally new client)
The person DOES NOT show up on the list, move on to Step 3
The person DOES show up on this list you need to merge duplicates - Chose ‘manage’ on one of the listings, click ‘merge with duplicate’, and put check marks on all the repeats. Note: This does not merge charts, just merges contact info into one “contact file”. Also, be very careful with people who have common names. Be very sure they are the same person!
Why is this important? Because if the person is listed multiple times, when you go to add from existing, you will see this person listed several times and you will not be able to tell which version is the one that will SHARE the email. If you pick the wrong one, it won’t work.
Add the person FROM EXISTING whether you are adding them as a contact or half of a couple. Since you’ve taken care of the merge (if needed), this person will be listed only once and it will allow you to add the person AND give them access to the portal.
Add the person as a NEW ENTRY. You won’t encounter any issues activating the portal.
IMPORTANT: Minors should never have a parent email listed under their name. The proper place for the parent’s email is in the contacts section in the chart. If the minor has their own email, that’s the one that will be listed under the child’s name. The advantage of this set up is that you can send certain things to the minor, like a questionnaire or measure, and certain things to the parent, like consent and billing documents. And the signatures will match the actual person it was sent to.
Secondary Workflow
There is no built in secondary workflow in SimplePractice. But a few tips can make the process go smoother!
SimplePractice has some really nice tools for submitting and tracking claims, but they are a bit lacking when it comes to managing secondary claims.
Here are a few tips to making it go smoother:
Write your secondary client’s last names in ALL CAPS so you can easily visually identify these clients in reminders and on reports
Set the client’s copay at $0
Add the client’s secondary insurance to their account AND include secondary insurance info on primary claim in the client’s Billing and Insurance settings:

When the primary EOB comes back, you will get a note in your reminders that there’s been an adjustment in the client’s account. The CAPS will tell you it’s a secondary client and it’s time to do the following steps:
In the client’s account, identify the dates of service that were adjusted. If a copay/deductible has been added, change the fee back to $0 and delete the adjustment invoice. What this does is put the balance back on the insurance side where it belongs, until the secondary cliam is processed.
Open the primary claim and click ‘Create secondary claim’. Be sure to adjust the modifiers as required by the secondary payer. NOTE: You will have to complete the secondary claim manually if you do not have ERAs set up — Here’s how.
Submit the secondary claim.
When the secondary claim is processed, charge the client according to the secondary EOB, if it indicates a Patient Responsibility.
Important: Be sure you are regularly running the Unpaid Insurance Report and tracking these items, which will be easy to do with the names in CAPS. Also, you can expect secondary claims to take more time than primary claims.
Wondering if you can refuse to file secondary (and even tertiary) claims?
The answer is no, not if you are in-network with any of the client’s plans.
You don’t have to submit to any plan that you are not in-network with, but if the client submits a superbill to that plan and provides you an EOB, you are obligated to submit the next claim in the sequence provided you are in-network with them.
In short, if you refuse to file the claim, or give a superbill to the client, you are in violation of your contract.
Cleaning up Invoices
If you haven’t been driven crazy by runaway invoices…you haven’t used SP. :-)
Get those things under control…once and for all!
UPDATE: Simple Invoicing has largely solved the messy invoice problem! Invoices will now automatically update when a fee is updated.
Turn it on today! Settings > Client Billing and Insurance > Client Billing Documents
How Invoices Work
Invoices are like polaroid pictures. The system takes a snapshot of the appointment on the day it occurs. If something changes, the system doesn’t change the original snapshot, it creates a new snapshot, an “adjustment invoice”, that adds or subtracts an amount from the fee on the original invoice to make the total match the fee on the appointment itself.
Examples
Original fee: $0 —> Original Invoice : $0
Updated fee: $20 —> Adjustment invoice: $20
Original fee: $100 - Original invoice: $100
Updated fee: $20 - Adjustment invoice: -$80
Why we clean up invoices
All invoices are dated the date they are created. This is fine if the invoice was created the same day as the appointment.
Where it starts to cause issues is when the adjustment invoices come through, they are dated the date that they were created. So when you create a statement, it’s almost impossible to figure out the true charge for a given date of service.
Running an easy-to-read statement is essential when trying to understand a client balance or credit, for both ourselves and our clients.
So when we create a statement, and it doesn’t make sense, we need to clean up the invoices.
My Invoice Motto
ONE Invoice for each date of service with the issue date MATCHING the date of service.
Steps
For any date of service with more than one invoice, delete all invoices.
Create a new invoice: New > Invoice
Choose one date of service (if there are multiple to choose from)
Create invoice
Change the issue date to match the date of service on the invoice line item
Save and close
Repeat for each date of service that has multiple invoices (you may have to go back quite a ways to find them all. It’s best to work oldest to newest)
Click ‘Add Payment’ and allocate funds back to the new invoices
Now when you run your statement you’ll be able to see the original fee and adjustment(s) for each date of service and each payment in chronological order.
Note that the time stamp of these invoice may put them a little out of order for each date, but it should still be pretty easy to follow.
If there are any mistakes with fees or payments, you’ll be able to see them quickly and easily. You’ll also feel good about giving this statement to a client because they will also be able to understand their balance.
Tip - Make sure the client’s copay is set correctly once you know what it is. This reduces the number of adjustment invoices that will occur since the amount will already match the EOB.
Unallocated Balances
There’s so much confusion about the unallocated amounts, and for GOOD REASON! Not only is this not designed well, SP’s implementation was akin to throwing us into the deep end of the pool and saying, “good luck!”
There’s so much confusion about the unallocated amounts, and for GOOD REASON! Not only is this not designed well, SP’s implementation was akin to throwing us into the deep end of the pool and saying, “good luck!”
A few key points to understand:
Invoices are the backbone to client billing, reporting, and payroll. Essentially, if it’s not on an invoice, it almost like it didn’t happen. This incudes charges AND payments. This is why we have to use them, and this is why SP wants to bring unallocated amounts to our attention.
Payments are initiated by the clinician and must be collected AND assigned to an invoice (allocated). This was instituted so we could apply partial amounts to invoices. There was a lot of complaining about lack of that back in the day! I think this is also paving the way for clients to be able to make partial payments in the portal, but we’ll see.
Unallocated amounts happen for the following two reasons:
Payment was collected but not assigned, so it’s in limbo (unallocated)
Payment was assigned but then the invoice was deleted/recreated. The payment become unassigned and went back into limbo (unallocated).
If there is an unallocated NUMBER (like: (13)) but the amount is $0 —>IGNORE IT! This means that there were transactions that occurred that aren’t attached to invoices. This is not a problem because there’s no actual money in limbo. Many of these numbers are from the older billing process. But it can also happen from refunds.
Keep it Neat!
The way to keep your accounts as tidy as possible is to keep your invoices as tidy as possible. Follow the clean up steps on this blog post if you already have a mess.
Use the Appointment Status Report in the client’s account for a quick birds-eye view of all charges. This is a very underutilized report in my experience with many, many SP users.
Use a statement to understand a client’s balance/credit. This ONLY works if invoices are cleaned up as per the blog post listed above.
Put the right copay in as soon as possible. The MINUTE you know the copay, get that changed in the client’s settings. Don’t keep allowing the system to create adjustment invoices. It’s not wrong it’s just messy and confusing!
I know this system is confusing, but with some education and practice, it’s completely functional. Could it be better, yes! And maybe they’ll make it better. But in the meantime, clean up the messes with help, which will help you learn how it works. Once you “get it”, it will no longer be so intimidating or confusing.
Are you seeing something I didn’t address here? Let me know so I can add more detail to this post!
Uncollectible Balances
You tried nice.
Maybe you tried not-so-nice.
Now you just want to move on.
You tried nice.
Maybe you tried not-so-nice.
Now you just want to move on.
Clearing an uncollectible balance cleans up your reports and gets rid of something that no longer needs your attention.
You can use this same method if you haven’t been using SP for billing clients and you want to clean the balances have been built up.
The best way to write off an uncollectible balance is with an invoice.
Go to Settings > Billing and Insurance > Products, and add a product called “Balance Adjustment”
Go to the offending account and click ‘New’ > Invoice
Click ‘Create Blank Invoice’
Add line item and choose ‘Balance Adjustment’
Add a NEGATIVE amount equal to the balance in the account and save
Click ‘ Add Payment’
You’ll notice unpaid invoices are already listed and check marked. Click ‘ Apply available credit ($xxx)’
Click ‘Allocate credit’
You’ll see that the account is now $0.

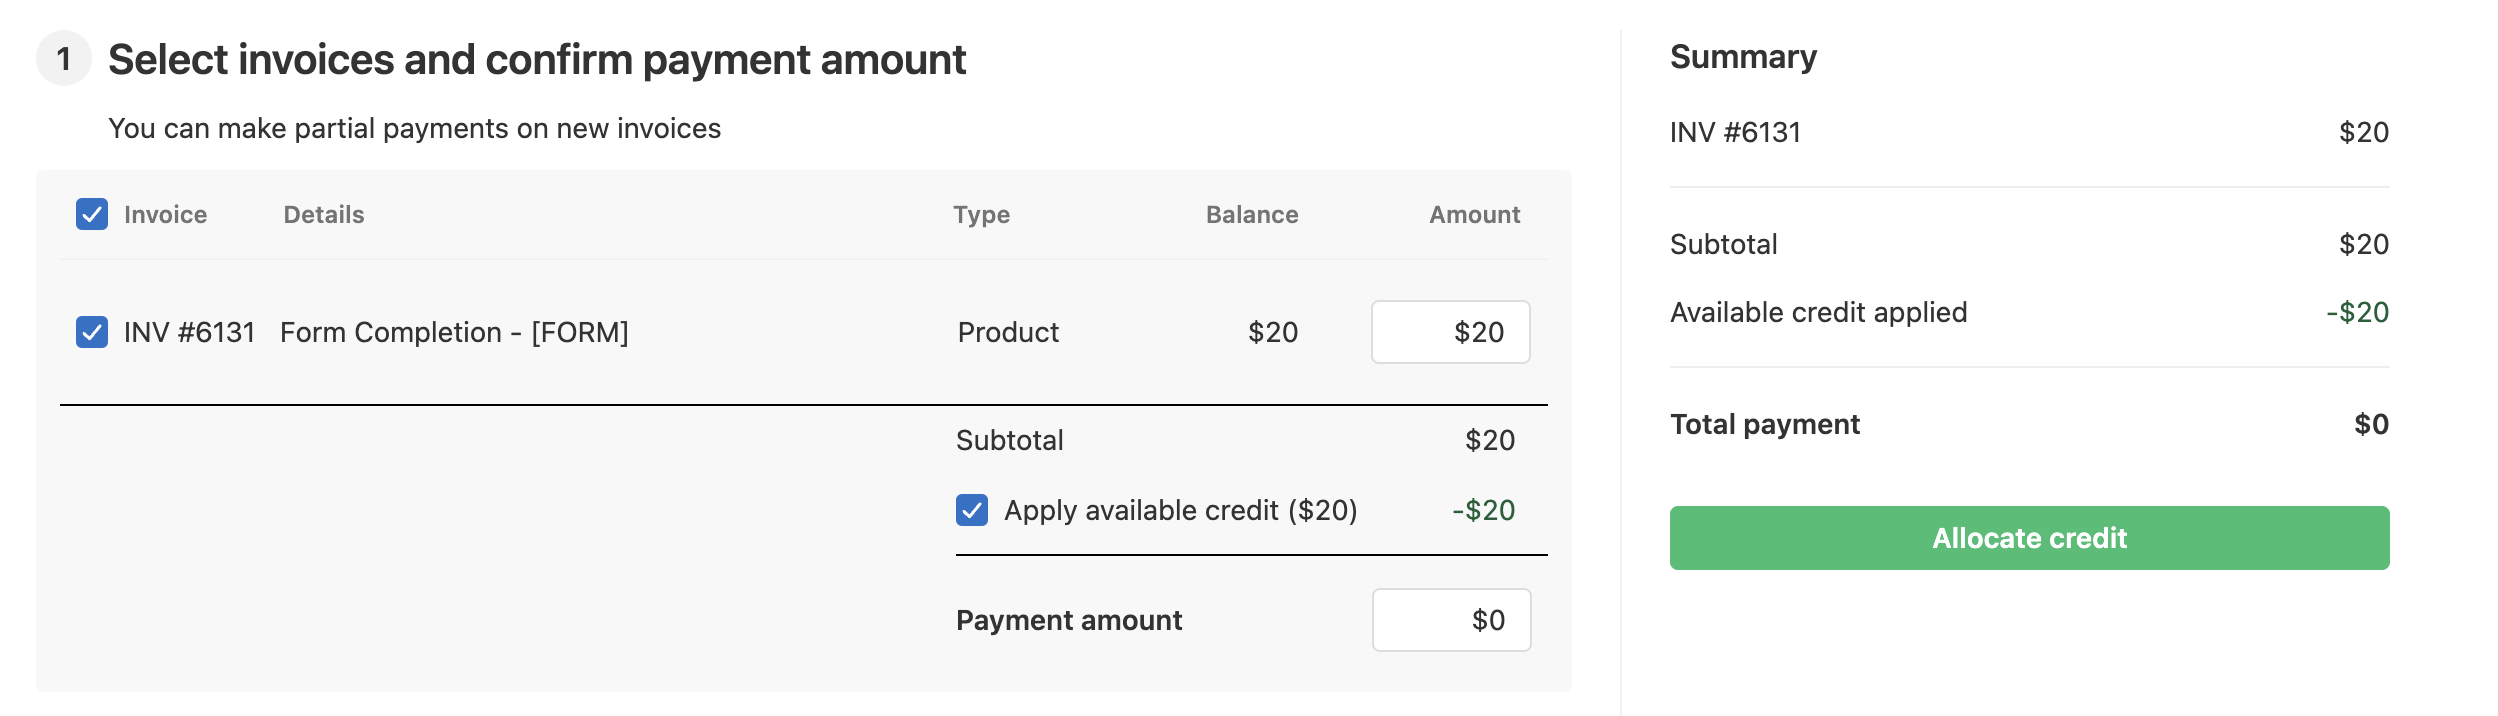
A few things to note:
If the client returns and you want to restore the balance, simply delete the uncollectible balance adjustment invoice.
If the client still has access to the portal and billing documents, they will be able to view the adjustment invoice. So, if you don’t want them to see it, turn off access in their settings.
If you are a group practice using the Income Allocation Report to compute payroll, the invoice credit that you create in this method will not affect clinicians’ income report as it is not counted as actual funds received.
Virtual Credit Cards
So you got a virtual credit card, sometimes called Vcards, instead of a check. Ugh! Now what? SimplePractice says to process them outside of SP. What??
NOTE: This is for the UPDATED billing experience. If you do not have the update, feel free to message me for the old process.
So you got a virtual credit card, sometimes called Vcards, instead of a check. Ugh! Now what? SimplePractice says to process them outside of SP. I don’t know about you, but I don’t like doing anything outside of SP if I can help it.
You can run Vcards in SimplePractice and it works great!
First, and most importantly, see if you can get the payer to send you paper checks or sign you up for EFTs (electronic funds transfers). Some payers will do it. But some are notoriously difficult and flatly refuse.
Paper checks or EFTs are best because you don’t have to pay the credit card processing fees, which often approach 3%.
If you’re stuck with Vcards, here’s what to do:
Create a client in your SP account called ‘Virtual Payments’
Click ‘Add Payment’, choose ‘+ New Online Card’ under the ‘Online Card on File’ option, and add the vcard information
On the ‘Virtual Payments’ billing tab, filter for ‘transactions by client’. Open the card payment you just added and click ‘Refund’. Change the refund method to cash and fill in the amount. (Do not forget to change the method or you might refund back the the vcard!)
Add the insurance payment to the client account(s) just as you would a paper check/EFT. NOTE: If you have ERAs set up with the payer, the payment might have already been to the client’s account. Be sure to check!
Do this for each vcard you need to process
Note: You will see an unallocated number in parentheses. As long at the total balance is $0, you can ignore that number. It’s just the number of transactions not attached to invoices, which is all of them in this account. It’s not an issue.



Stop Losing Hours to EHR & Billing Headaches
Every minute spent struggling with software or looking for missing money is a minute stolen from income, client care, or self care.
Streamline your practice today—book a consult, request a full audit, or jump straight into scheduling a meeting.
Not yet a SimplePractice user?
Sign up here to get an exclusive offer!